Unix shell


In the various versions of Unix (be it Linux, MacOS or some other flavor), an interpreted command-line interface with the operating system is referred to as a shell. When you open a Cygwin64 Terminal program, that launches a shell allowing you to interact with the Windows operating system. The terminal is the software (or in the old days, the hardware) making the connection with the computer. If you have Linux or MacOS installed on your computer, you will generally be interacting with the operating system through a graphical user interface, or some form of windowing application; however, it is still possible to accomplish much of what you need through the launching of a terminal program and then interacting with the operating system through a command-line shell.
(My apologies for being pedantic, but we assume that if you're even considering this option, you'd like to be aware of the exact details.)
Whether you launch the MacOS Terminal, a Cygwin64 Terminal on Windows or use PuTTY on Windows to establish a connection with a computer like ubuntu.uwaterloo.ca, you will be presented with a shell interface. When you establish a connection, your current working directory will be your home directory.
If you would like to interface with the department Linux servers, the first thing you should do is download PuTTY at Simon Tatham's web site. Next, launch PuTTY, and you will see it requesting for a host name:

To make your life simpler, perform the following steps:
- Under Host Name (or IP address), enter eceubuntu.uwaterloo.ca but do not press Enter. Do not change the port.
- Under Save Sessions, enter the text ECE or whatever you choose to identify this session as logging into the department's Linux server.
- Click Save.
Now, the next time you launch PuTTY, you can just double click on the saved session, but for now, just select Open at the bottom of the screen. You will log on with your uWaterloo User ID and its associated password (these are the same you use to log onto Quest).
Warning: If you have a weak password and another student guesses your password and copies your code and submits it, you are equally responsible. Make sure that your Quest password is secure.
When you launch a Cygwin64 Terminal in Windows or Terminal in MacOS, you will not be prompted for a login name and password.
The next step is to discover where you are:
the working directory is /home/your-user-id.$ pwd
This will give you the absolute path to your home directory. It is in this directory that you will start adding your projects.
First, make a directory ece150 and change to that directory:
$ mkdir ece150
$ cd ece150
$
Recall that you need only type the first few unique letters and then press Tab for command completion:
$ cd e
Next, you should probably create one directory per project. I would advise that you not include spaces in your project names, as this makes life easier in the shell:
$ mkdir Project0
$ cd Project0
$
Now you can use whatever editor you wish to create your files.
$ nano main.cpp
$ vi main.cpp
or whatever other editor you'd like to use. The program nano is relatively straight-forward. If you want to learn a real editor, please visit this tutorial.
Once you have saved your source file, you can compile it with
$ g++ main.cpp
$ ls
a.out   main.cpp
The executable is called a.out, and this stands for assembler output. If you type the name of an executable, Unix will only look in the directories specified in the PATH environment variable:
$ echo $PATH
/usr/lib64/qt-3.3/bin:/usr/local/bin:/usr/bin:/usr/local/sbin:/usr/sbi
n:/opt/texlive/2017/bin/x86_64-linux:/opt/thinlinc/bin
In this case, this specifies the directories
- /usr/lib64/qt-3.3/bin
- /usr/local/bin
- /usr/bin
- /usr/local/sbin
- /usr/sbin
- /opt/texlive/2017/bin/x86_64-linux
- /opt/thinlinc/bin
You will note that the current working directory is not included in this list.
Instead, you must launch your program by specifying an absolute or relative path, the easiest being a relative path from an alias for the current directory:
$ ./a.out
Hello world!
$
If your program does not compile, you will see a number of error messages listed.
Copying files to and from Linux Servers
When it comes time to handing in your source code, if you are using MacOS or Windows, you will have access to your source code; however, if you are developing your code on the departmental Linux server, you will have to access your source code. To either copy your source code from the Linux server to your local computer or vice versa, you must run a secure file transport protocol (sftp) program.
Unix and MacOS
If you are in MacOS, you can do this with the sftp program in Terminal. First, navigate to the local directory which contain the files you want to copy to the Linux server, or the local directory into which you want to copy the files that are currently on the Linux server. Next, use
$ sftp uwuserid@eceubuntu.uwaterloo.ca
and log in. You will now be shown a prompt in the sftp program:
$ sftp uwuserid@eceubuntu.uwaterloo.ca
uwuserid@eceubuntu.uwaterloo.ca's passeord:
Connected to eceubuntu.uwaterloo.ca
sftp>
Use cd inside the sftp program to navigate to the directory on the Linux server that contains either the files you want to copy back to your local computer, or the directory to which you want to copy files that are currently on your local computer. Next, use the commands to put files onto the Linux server:
sftp> put filename.cpp
or get files from the Linux server onto your local machine:
sftp> get filename.cpp
You can use wild-cards (e.g., *) to copy multiple files.
When you are finished, enter the command exit and you will be back in your shell.
sftp> exit
$
Windows
If you want to copy files in Windows, launch WinSCP (which stands for secure copy):
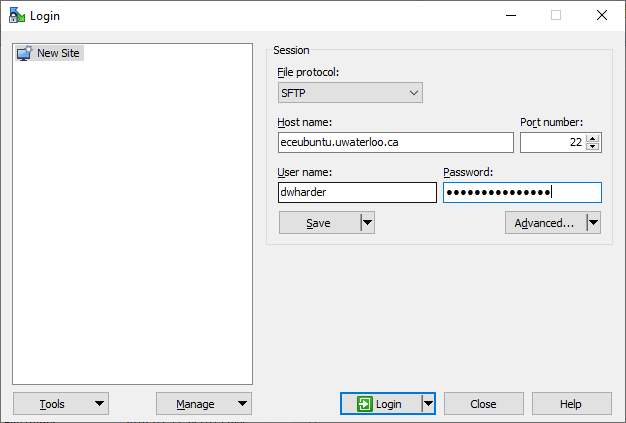
When you enter this information, click Save.
When your connection is established, you will see two file systems: on the left will be your local computer, and on the right you will see the home directory on (in this case) the departmental Linux server. You can navigate in both Windows, or you can just drag files to the right-hand panel to copy to the Linux server and drag files from the right-hand panel to copy files to your local machine.
Department of Electrical and Computer Engineering
University of Waterloo
200 University Avenue West
Waterloo, Ontario, Canada N2L 3G1
Website maintained by Douglas Wilhelm Harder