The Eclipse Integrated development environment (IDE)


For very simple examples of authoring and executing C++ programs, one can use cpp.sh or replit.com; however, this is useful only for simple programs, and there are no real features for saving your programs and functions. This is, of course, insufficient for larger projects. These sites are, however, excellent for learning some of the basics of programming, as they do not require any significant set up. Unfortunately, these sites generally only provide the first two of three features needed for serious code development.
There are three features that we require for developing programs:
- an editor,
- a compiler, and
- other tools to aid in the development process.
One tool that is indispensable is a debugger. Up to this point, most of your errors, if any, have likely been compiler errors; however, it is very easy with any non-trivial program to also make a programming error: the program functions, but it doesn't do what you want it to do.
As an example, you may have forgotten that arrays are indexed from 0 to n - 1, and so in calculating the average, you performed the following loop:
	for ( int i{1}; i <= n; ++i ) {
		sum += data[i];
	}
Unfortunately, in most cases, this will compile, and it will with almost 100% certainty even execute, but the result will access memory beyond the end of the array when calculating the average, and it will leave out the value stored in data[0].
To find such issues with your code (or bugs), it is often useful to use a debugging tool.
The cpp.sh and replit.com sites gives (at least up to this point) you the first two: an editor and a compiler, but there is no debugger, and there are no other tools.
Fortunately, there are developers and corporations out there who produce applications that include all of these features, including editors, compilers, debuggers and many more development tools. Because these applications integrate all of these into a single program that you can execute and develop your code in, they are called integrated development environments or IDEs, for short.
There are many IDEs available, some of which are available for free:
- The Eclipse C/C++ IDE for C/C++ Developers,
- CLion,
- VisualStudio for Windows, and
- Xcode for Mac.
In previous years, we have focused on using Eclipse, as it is a mature and stable platform available for Windows, OS X and Linux. While we are now looking more at VS Code, if you are already familar with Eclipse, you are welcome to continue using it. Also, it will demonstrate an important tool in engineering: dividing a problem into independent separate sub-problems or sub-systems and solving those systems independently. Eclipse is an IDE and nothing more. It does not come with a C++ compiler; for that we must look elsewhere. This is also only reasonable: the developers at Eclipse are looking to produce the best multi-platform integrated development environment. The developers of the GNU C++ compiler, however, are focused entirely on optimizing that product. Thus, if you like the GNU C++ compiler, you should be able to use it with any IDE; while if you like Eclipse, but prefer a different compiler, again you should be able to make that choice. Thus, we will discuss
- installing the Eclipse IDE for C/C++ Developers,
- installing Java,
- for those using the Microsoft Windows Operating System, installing C/C++ compiler,
- the use of environment variables, and
- finally launching Eclipse.
Installing Eclipse
Now, new updates are continually
being provided by Eclipse, so to get the most recent version, go to the
Eclipse IDE website, and
from there, first select the Desktop IDEs download link, and
from there, select the C/C++
 icon.
icon.
On the Eclipse IDE for C/C++ Developers web site you may select your download from the right-hand menu. If you are installing on either Windows or Linux, be sure to record whether you downloaded the 32- or 64-bit version of the IDE. For most modern computers, you will likely select the 64-bit version.
When you download the appropriate version of the C++ IDE, you will see that it is not an installation program,
but rather an archive. Within that archive is a single directory eclipse which you can
extract and move to your home directory (or wherever you wish). Eclipse executes within the
Java Runtime, so there is no need for an installation.
Inside the directory eclipse, there is an
executable eclipse.exe with the Eclipse icon ![]() .
However, before we go on, you should ensure that the appropriate version of Java
is installed, and the environment variable
.
However, before we go on, you should ensure that the appropriate version of Java
is installed, and the environment variable
Installing Java
There is only one version of Java available for Mac OS X, so if you own an Apple desktop or laptop computer, you are fortunate. For Windows and Linux, there are two versions: the default (a 32-bit) version and a 64-bit version. You will need the version corresponding to the version of Eclipse that you installed. For this, you will have to visit the manual download page.
In Windows, if there is an issue with the installation of Java and you attempt to launch Eclipse, you may see one of the following two dialogs depending on whether you do not have Java installed, or you do not have the 64-bit version of Java installed, respectively:
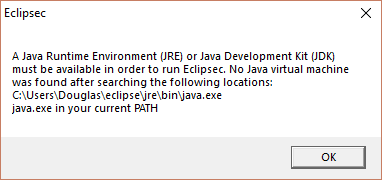 or
or
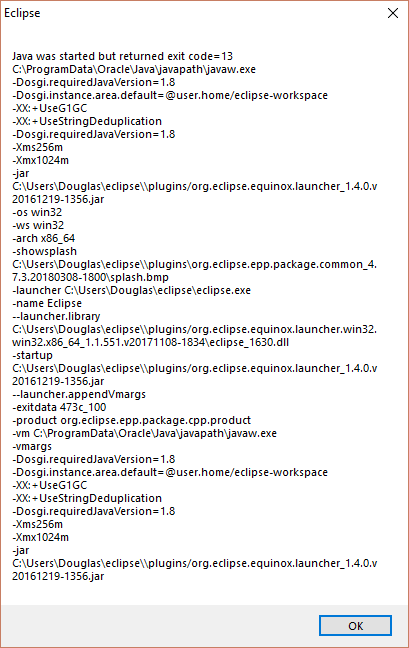
By the end of your second year of studies, you will understand the significance of terms like 32-bit and 64-bit.
Installing a C/C++ compiler
Both Mac OS X and Linux have the GNU C/C++ compiler (usually written as gcc and g++, respectively. Consequently, you should have no issues. Open a terminal and type g++ --version. On my current computer, when I type this, I get
$ g++ --version
g++ (GCC) 4.8.5 20150623 (Red Hat 4.8.5-16)
Copyright (C) 2015 Free Software Foundation, Inc.
This is free software; see the source for copying conditions.  There is NO
warranty; not even for MERCHANTABILITY or FITNESS FOR A PARTICULAR PURPOSE.
Always check the version of g++, as the features we will be discussing are from the C++ 2011 standard, which requires g++ (GCC) 4.8.x. If you are on Mac OS X or Linux and your version of g++ is out of date, it is likely you are familiar enough with the information necessary to find and install a newer version. If not, Google.ca is your friend.
For users of Microsoft Windows, we will have you install Cygwin, a unixesque interface for Windows. First, visit the cygwin.com, and from the left-hand menu Install Cygwin. You may select either the 64-bit or the 32-bit versions, based on your versions of Eclipse and Java.
You will download the setup executable and launch it. I would suggest you select the defaults up until the Choose Download Site(s) dialog. From here, you can select an institution close to you. The site mirror.csclub.uwaterloo.ca is in southern Ontario and muug.ca is in Manitoba. If you do not see any sites, in the field User URL:, enter the text http://mirror.csclub.uwaterloo.ca/cygwin/ and select Add.
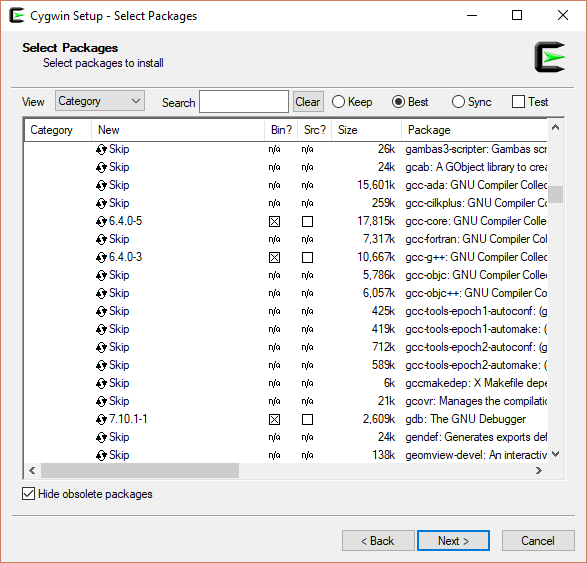
After you select a mirror, it begins a download and brings up the Select Packages dialog:
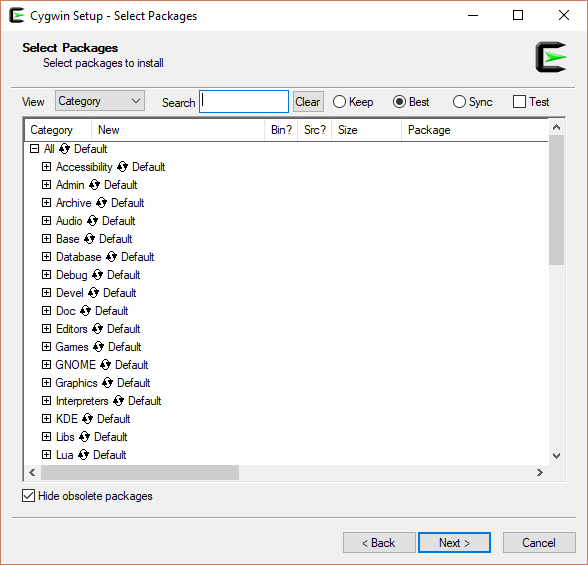
If you only see a single entry All, click the ⊞ to its left.
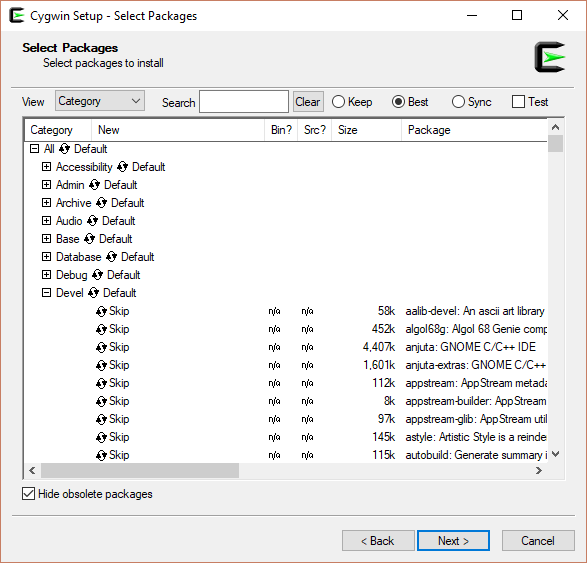
The packages we need fall under development or Devel, so open the development tree by clicking the ⊞:
 or
or
The packages you will have to include are:
- gcc-core: GNU Compiler Collection (C, OpenMP)
- gcc-g++: GNU Compiler Collection (C++)
- gdb: The GNU Debugger
- make: The GNU version of the 'make' utility
When you select Skip, the word is replaced by the version of that package that will be added, as shown here:
 or
or
As you continue, it asks you to confirm the changes after which
it will begin installing Cygwin. This will take a while, but when
it is finished, it will prompt you for a few more matters, and I
personally pin the application  to the taskbar.
You can launch Cygwin and try typing a few commands:
Copying skeleton files.
These files are for the users to personalise their cygwin experience.

They will never be overwritten nor automatically updated.

'./.bashrc' -> '/home/Douglas//.bashrc'
'./.bash_profile' -> '/home/Douglas//.bash_profile'
'./.inputrc' -> '/home/Douglas//.inputrc'
'./.profile' -> '/home/Douglas//.profile'

Douglas@parliament ~
$ pwd
/home/Douglas

Douglas@parliament ~
$ which g++
/usr/bin/g++

Douglas@parliament ~
$ g++ --version
g++ (GCC) 7.4.0
Copyright (C) 2017 Free Software Foundation, Inc.
This is free software; see the source for copying conditions.  There is NO
warranty; not even for MERCHANTABILITY or FITNESS FOR A PARTICULAR PURPOSE.

Douglas@parliament ~
$
The first command, pwd, asks to print the working directory. My home directory on Windows is C:\Users\Douglas, but this is /home/Douglas. This is due to all directories being subordinate to the directory (in my case) C:\cygwin64:
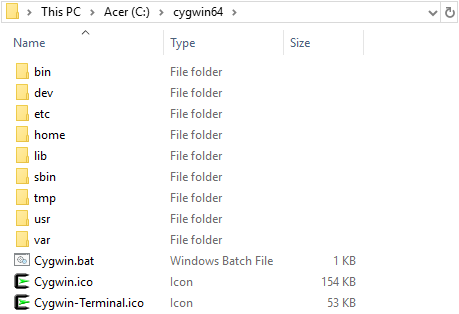
In the home directory you will see your home directory. In Unix, the symbol separating directories is / and not \.
The next command says: "which executable g++ are we using"? That is, in which directory is g++? It gives you the path /usr/bin/g++, which translates into the absolute address C:\cygwin64\bin\g++.exe. This is odd, but there is a justification provided here.
Environment variables
Inside of Cygwin, you can execute g++ from anywhere, but if you open a Command Prompt, we're not so fortunate, as you must explicitly give the full path to the executable:
Microsoft Windows [Version 10.0.16299.125]
(c) 2017 Microsoft Corporation. All rights reserved.

C:\Users\Douglas>g++ --version
'g++' is not recognized as an internal or external command,
operable program or batch file.

C:\Users\Douglas>C:\cygwin64\bin\g++.exe --version
g++ (GCC) 7.4.0
Copyright (C) 2017 Free Software Foundation, Inc.
This is free software; see the source for copying conditions.  There is NO
warranty; not even for MERCHANTABILITY or FITNESS FOR A PARTICULAR PURPOSE.

C:\Users\Douglas>python
Python 3.6.4 (v3.6.4:d48eceb, Dec 19 2017, 06:54:40) [MSC v.1900 64 bit (AMD64)] on win32
Type "help", "copyright", "credits" or "license" for more information.
>>> exit()

C:\Users\Douglas>
Notice, however, that when I type python, it immediately finds the corresponding executable!
This is a general problem that operating systems must solve, and the original way to solve this problem was through environment variables. You can associate a symbol with a sting, and programs will then request those strings from the operating system. One such environment variable is the symbol PATH, and this is associated with a semi-colon separated list of directory paths that will be searched for executables. For example, in Windows, this author can print the path as follows:
C:\Users\Douglas>echo %PATH%
C:\ProgramData\Oracle\Java\javapath;C:\Program Files (x86)\AMD APP\bin\x86_64;C:
\Program Files (x86)\AMD APP\bin\x86;C:\WINDOWS\system32;C:\WINDOWS;C:\WINDOWS\S
ystem32\Wbem;C:\WINDOWS\System32\WindowsPowerShell\v1.0\;C:\Program Files (x86)\
ATI Technologies\ATI.ACE\Core-Static;C:\Program Files (x86)\AMD\ATI.ACE\Core-Sta
tic;C:\WINDOWS\System32\OpenSSH\;C:\Program Files (x86)\Java\jre1.8.0_161\bin;C:
\Program Files\Java\jre1.8.0_161\bin;C:\Users\Douglas\AppData\Local\Programs\Pyt
hon\Python36\Scripts\;C:\Users\Douglas\AppData\Local\Programs\Python\Python36\;C
:\Users\Douglas\AppData\Local\Microsoft\WindowsApps;C:\Program Files\MATLAB\R201
5a\runtime\win64;C:\Program Files\MATLAB\R2015a\bin;
Displaying this more clearly, the directories in the path are:
	C:\ProgramData\Oracle\Java\javapath;
	C:\Program Files (x86)\AMD APP\bin\x86_64;
	C:\Program Files (x86)\AMD APP\bin\x86;
	C:\WINDOWS\system32;
	C:\WINDOWS;
	C:\WINDOWS\System32\Wbem;
	C:\WINDOWS\System32\WindowsPowerShell\v1.0\;
	C:\Program Files (x86)\ATI Technologies\ATI.ACE\Core-Static;
	C:\Program Files (x86)\AMD\ATI.ACE\Core-Static;
	C:\WINDOWS\System32\OpenSSH\;
	C:\Program Files (x86)\Java\jre1.8.0_161\bin;
	C:\Program Files\Java\jre1.8.0_161\bin;
	C:\Users\Douglas\AppData\Local\Programs\Python\Python36\Scripts\;
	C:\Users\Douglas\AppData\Local\Programs\Python\Python36\;
	C:\Users\Douglas\AppData\Local\Microsoft\WindowsApps;
	C:\Program Files\MATLAB\R2015a\runtime\win64;
	C:\Program Files\MATLAB\R2015a\bin;
Consequently, for example, if I type matlab at the command prompt, it will look for an executable called matlab in all of these directories, and when it gets to the last directory, it will find matlab.exe. When I type g++, however, g++, the executable g++.exe is not found in any of the above directories.
To add additional directories to the PATH environment variable, open the System Properties window (alternatively, search for environment and choose the item found related to editing environment variables) and select the Environment Variables... link. This will open the Environment Variables window and from the User variables for You, highlight Path and then select Edit.... In the Edit environment variable dialog that is opened, select New and enter C:\Cygwin64\bin. Select OK and continue selecting OK, closing the two previous windows.
Note that in some circumstances, changes to the environment variables do not take immediate effect. It may be necessary to either log out and log back into your account, or it may even be necessary to restart your computer.
You can now check that everything is working by launching another Command Prompt:
Microsoft Windows [Version 10.0.16299.125]
(c) 2017 Microsoft Corporation. All rights reserved.

C:\Users\Douglas>g++ --version
g++ (GCC) 7.4.0
Copyright (C) 2017 Free Software Foundation, Inc.
This is free software; see the source for copying conditions.  There is NO
warranty; not even for MERCHANTABILITY or FITNESS FOR A PARTICULAR PURPOSE.


C:\Users\Douglas>
Alternatively, you can echo the %PATH% environment variable and see whether or not this directory is included in the list.
If you need further assistance, or would like more information, here are two recommended web sites:
Some students have also searched YouTube for presentations that assist in setting environment variables.
If you are a Windows user, you are now ready to launch Eclipse.
Launching Eclipse
When you launch Eclipse, it will first offer you a dialog asking you were you would like your eclipse-workspace. This is where all your C++ projects will be stored. I choose the default: C:\Users\Douglas\eclipse-workspace\, so when you see screen shots, you should be able to deduce where on your system such files are.
Next, Eclipse will prompt you for permission for anonymous usage statistics. You are welcome to allow this or not; however, you should make sure you are informed on this matter before blindly agreeing.
Finally, we come to the welcome page, which should looks similar to:
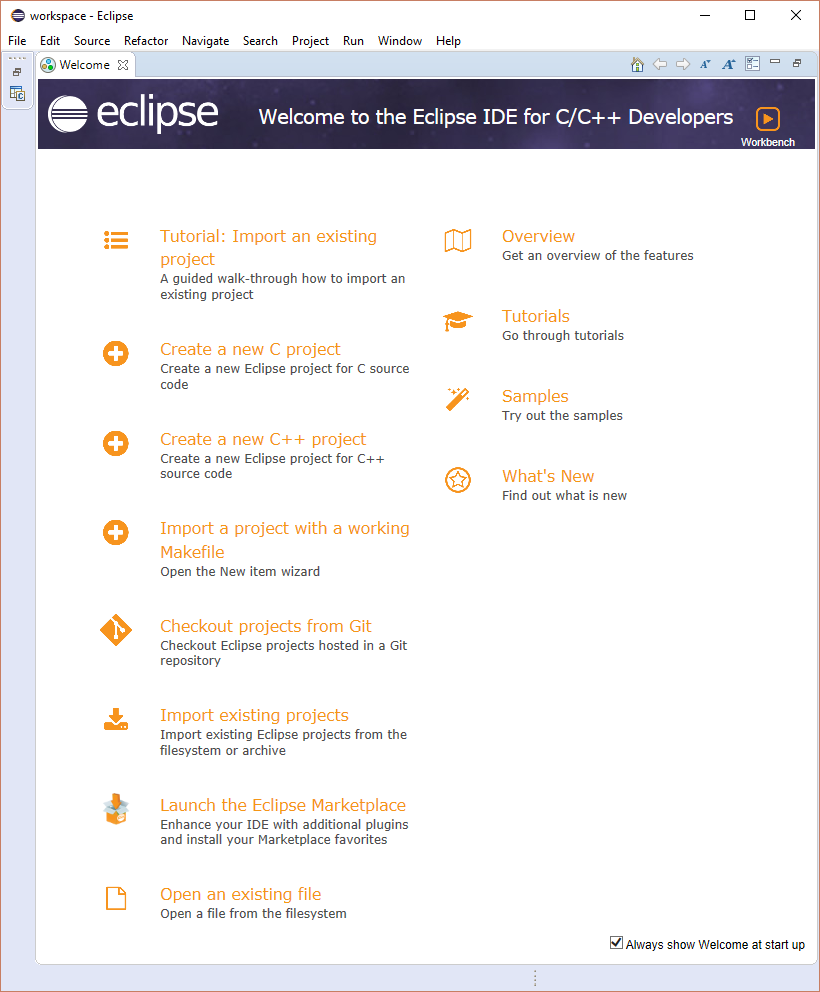
or something similar to this. Close the Welcome tab. We will, however, create a new project from the menus:
From the menus, select File→New→C/C++ Project. This will bring up the New C/C++ Project window, from which you should select C++ Managed Build and then Next >.
This will bring up the C++ Project window and you will have to:
- Select a unique project name, preferably without spaces (using underscores or camel-case naming).
- Select a Project type. We will generally be making executable projects, and therefore you will select one of Empty Project and their Hello World C++ Project.
- Select a Toolchain, from which you should select Cygwin GCC.
You will have to give the project a new and unique name, and you will have to select the type of project. By default, there are only two projects.
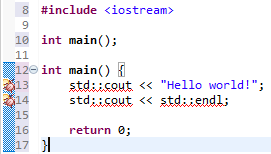
When you take a look at Their_first_project, you should replace everything after and including the line
#include <iostream>
with
#include <iostream>

int main();

int main() {
	std::cout << "Hello world!";
	std::cout << std::endl;

	return 0;
}
We will not use the using command in this course, as it is our intention to teach good programming practices; practices that you will use in the real world when you go on your co-operative education work placements. It is not our intention that you simply be able to author code that happens to be able to compile—it is our intention to enable you to acquire the skills necessary to author good programs that are well documented, verifiable and maintainable.
Compiling your project
With this default project, you should have a screen that looks like:
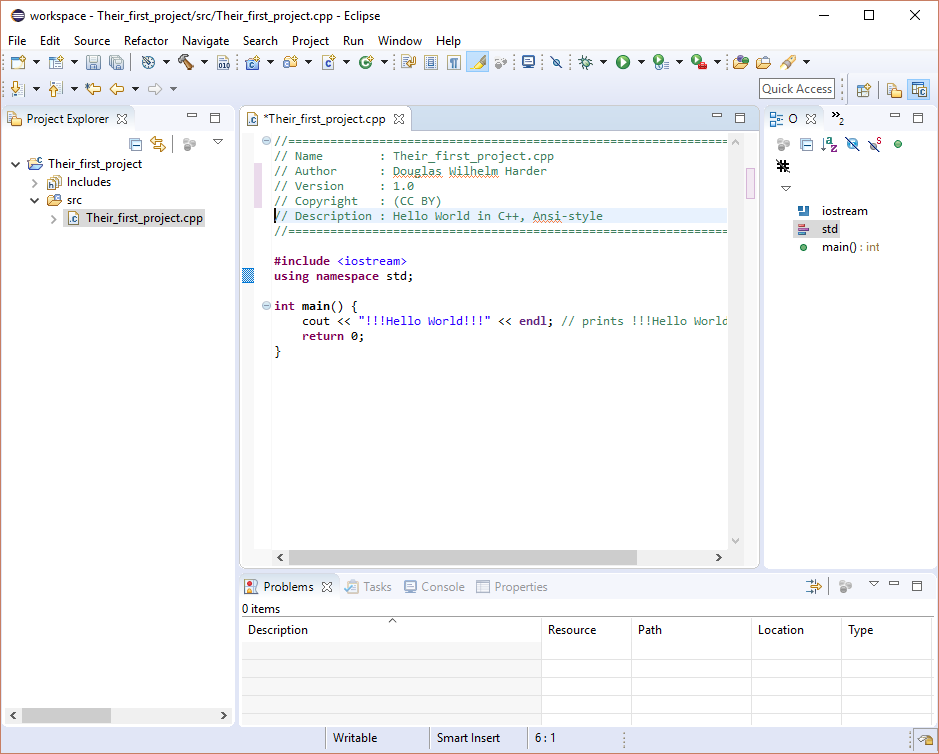
In cpp.sh, you simply hit Run. Here, however, here it is more involved. This is because any IDE is designed to work with incredibly large projects, as opposed to simple one-file projects (although, that's what we'll be starting with).
First, we must build an executable. From the menu, select Project→Build All, or alternatively, use Ctrl-B.
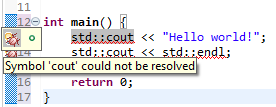
Warning: If Eclipse seems to suggest that it does not recognize std::cout or std::endl, this may indicate a problem in finding the iostream header file. For example, the following image shows how Eclipse indicates this problem:
To the left of the line number is what appears to be a small red bug. This is identifying a potential problem. If you hover your mouse pointer over the red bug, you will get some information:
To fix this problem, select the Project Explorer tab in the left panel. If you cannot see this, select Window→Show View→Project Explorer. Select the project you are currently working on, and then select Project→Close Project. Having done so, select the same project and once again select Project→Open Project. The problem, will have gone away.
Immediately, you see a new folder appear in your project: Debug. We will ignore this for now, but instead we will get this project running: you may choose any of:
- selecting Run→Run from the menu,
- entering Ctrl-F11, or
- selecting the green play button
 .
.
Like in cpp.sh, the output appears under the tab Console in the lower window; in this case, the grammatically incorrect text !!!Hello World!!!.
Command-line execution
An alternative way of running this code is run the executable from the command line. to go to the Command Prompt.
In Windows
Microsoft Windows [Version 10.0.16299.125]
(c) 2017 Microsoft Corporation. All rights reserved.

C:\Users\Douglas>cd eclipse-workspace\Their_first_project

C:\Users\Douglas\workspace\Their_first_project>dir
 Volume in drive C is Acer
 Volume Serial Number is CEH4-1349

 Directory of C:\Users\Douglas\workspace\Their_first_project

04/02/2018  07:31 AM    <DIR>          .
04/02/2018  07:31 AM    <DIR>          ..
04/02/2018  07:08 AM            13,428 .cproject
04/02/2018  07:08 AM               847 .project
04/02/2018  07:08 AM    <DIR>          .settings
04/02/2018  07:25 AM    <DIR>          Debug
04/02/2018  07:08 AM    <DIR>          src
               2 File(s)         14,275 bytes
               6 Dir(s)  250,776,379,392 bytes free

C:\Users\Douglas\workspace\Their_first_project>
Here, all you see are the directories src, for which we can list the directory contents:
C:\Users\Douglas\workspace\Their_first_project>dir src
 Volume in drive C is Acer
 Volume Serial Number is CEH4-1349

 Directory of C:\Users\Douglas\workspace\Their_first_project\src

04/02/2018  07:08 AM    >DIR>          .
04/02/2018  07:08 AM    >DIR>          ..
04/02/2018  07:25 AM               468 Their_first_project.cpp
               1 File(s)            468 bytes
               2 Dir(s)  250,786,504,704 bytes free

C:\Users\Douglas\workspace\Their_first_project>
Instead, we will go into the debug directory:
C:\Users\Douglas\workspace\Their_first_project>cd Debug

C:\Users\Douglas\workspace\Their_first_project\Debug>dir
 Volume in drive C is Acer
 Volume Serial Number is CEH4-1349

 Directory of C:\Users\Douglas\workspace\Their_first_project\Debug

04/02/2018  07:25 AM    <DIR>          .
04/02/2018  07:25 AM    <DIR>          ..
04/02/2018  07:43 AM             1,445 makefile
04/02/2018  07:25 AM               239 objects.mk
04/02/2018  07:43 AM               553 sources.mk
04/02/2018  07:25 AM    <DIR>          src
04/02/2018  07:25 AM           284,449 Their_first_project.exe
               4 File(s)        286,686 bytes
               3 Dir(s)  250,775,982,080 bytes free

C:\Users\Douglas\workspace\Their_first_project\Debug>
Here we see the executable from your project, and we can run it:
C:\Users\Douglas\workspace\Their_first_project\Debug>Their_first_project.exe
!!!Hello World!!!

C:\Users\Douglas\workspace\Their_first_project\Debug>
There are other files and directories there, but we will ignore these for now.
In Mac OS X and Linux
In Mac OS X, you can find the terminal program in
Applications→Utilities where you will find
the Terminal application: ![]() .
In Linux, you may be able to use Ctrl+Alt+T or search
for term.
.
In Linux, you may be able to use Ctrl+Alt+T or search
for term.
In the terminal, you can navigate to your workspace. If you placed it into your home directory, you
$ pwd
/home/Douglas
$ cd workspace/Their_first_project
$ ls
$ cd Debug
$ ls
$ ./Their_first_project
!!!Hello World!!!
$
One interesting point about Mac OS X and Linux is that by default, they will not search the current directory for an executable. To run an executable in the current directory, you must explicitly add ./ in front of the executable name so that ./Their_frist_project essentially says: "In this directory, launch the Their_first_project executable.
Build versions
By default, you are building a debug version of your program. We will go into this later, but this includes additional information in the executable that allows you to debug it. For example, it is possible watch your program execute line-by-line and it is also possible to watch variables change their values as instructions are executed. Normally, the variable names would not be stored in the executable; however, for the debug version, such information is included so that you can see how variables change as the algorithm progresses.
You can, however, compile the program so that it does not include any additional information:
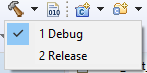
If you re-build the project, you will now see a second directory appear in the project: Release.
We now have two executables, and you can see that there are two executables: one in the Debug directory and one in the Release directory. The debug version, which contains information not in the release, is 80% larger than the release version:
Microsoft Windows [Version 10.0.16299.125]
(c) 2017 Microsoft Corporation. All rights reserved.

C:\Users\Douglas>cd workspace\Their_first_project

C:\Users\Douglas\workspace\Their_first_project>dir
 Volume in drive C is Acer
 Volume Serial Number is CEH4-1349

 Directory of C:\Users\Douglas\workspace\Their_first_project

04/02/2018  07:31 AM    <DIR>          .
04/02/2018  07:31 AM    <DIR>          ..
04/02/2018  07:08 AM            13,428 .cproject
04/02/2018  07:08 AM               847 .project
04/02/2018  07:08 AM    <DIR>          .settings
04/02/2018  07:25 AM    <DIR>          Debug
04/02/2018  07:32 AM    <DIR>          Release
04/02/2018  07:08 AM    <DIR>          src
               2 File(s)         14,275 bytes
               6 Dir(s)  251,429,101,568 bytes free

C:\Users\Douglas\workspace\Their_first_project>dir Debug\Their_first_project.exe
 Volume in drive C is Acer
 Volume Serial Number is CEH4-1349

 Directory of C:\Users\Douglas\workspace\Their_first_project\Debug

04/02/2018  07:25 AM           284,449 Their_first_project.exe
               1 File(s)        284,449 bytes
               0 Dir(s)  251,419,742,208 bytes free

C:\Users\Douglas\workspace\Their_first_project>dir Release\Their_first_project.exe
 Volume in drive C is Acer
 Volume Serial Number is CEH4-1349

 Directory of C:\Users\Douglas\workspace\Their_first_project\Release

04/02/2018  07:32 AM           157,827 Their_first_project.exe
               1 File(s)        157,827 bytes
               0 Dir(s)  251,418,607,616 bytes free

C:\Users\Douglas\workspace\Their_first_project>
Additional Installation Information for Mac OS X
The first step to install the eclipse IDE for C/C++ developers is to download the software from the Eclipse website. Go to the following link and download the Mac OSX 64 bit version. Most Macs will be running the 64 bit version of Mac OSX hence needing the 64 bit version.
Eclipse for C++ Developers Download Link
Once this is installed open it. When opening the software there are a variety of error messages that may occur. The most common are a notification that you need a new version of Java or you may get an error saying “The eclipse executable launcher was unable to locate its companion launcher jar.” Both of these errors mean that you need to install the newest version of the Java Development Kit (JDK). Despite the fact that you computer likely has a version of Java on it, JDK is different than the standard java that is needed to run apps etc. To download JDK go to the following link and click “I accept the license agreement”. Make sure that you select the 64 bit version for Mac. The most common reason why Eclipse won’t open after an install is because you are missing JDK.
The next step will be to open the software. Select that you want to create a new C++ program. Give this project a name (it can be anything) and select “Hello world c++ example” and “Mac OSX GCC”.
Once you do this you may get an error message if you do not have the c++ compiler. It will say you need to either download Xcode or press install to install just the compiler you need. Simply press install and it will install the C++ compiler.
Once your project is created press the hammer icon to build the program, then run it. There should not be any errors and it should execute properly. If it does not this means you do not have the compiler. It may also say “binary not found”.
If this occurs download Xcode. Once it has downloaded go to Xcode>preferences. Install “Command Line Tools” (click the install button in front of this choice). Next check that the compiler is installed by going to terminal and typing in “g++ --version”. If the compiler is there you will get a few lines mentioning the version etc. Now you have the compiler and the code should compile. Make sure you select the local option when running the project.
Managing multiple projects
In this course, you will be working on multiple projects. Generally, it is easier to work with only one project open. If you cannot already see the Project Explorer tab on the left, select Window→Show View→Project Explorer from the menu. Next, close all projects you are not currently working on by select each project and then selecting from the menu Project→Close Project. When you want to work on a project, choose that project on the Project Explorer tab and select from the menu Project→Open Project.
Department of Electrical and Computer Engineering
University of Waterloo
200 University Avenue West
Waterloo, Ontario, Canada N2L 3G1
Website maintained by Douglas Wilhelm Harder