Projects
There are four projects for the MTE 241 course. The goal of the laboratories is to make you familiar with microcontroller and real-time development. Projects are done in groups of two or individually. Project 4 will have a well-defined project; however, it is also open ended allowing groups to choose their own alternatives, including allowing groups to join where they use a CAN bus to communicate between two Keil boards.
There are six laboratory periods during which the laboratory instructor and teaching assistants will be available in the laboratory room. The relationship between the projects and laboratories is as shown in this table.
| Project | 1 | 2 | 3 | 4 |
| Associated labroatories | 1 | 2 | 3, 4 | 5, 6 |
Each project will have a submission and a demonstration.
Project descriptions
A general description of the projects together with the expected outcomes are listed here:
- An introduction with the outcomes that you will
- demonstrate an understanding of data structures,
- prepare software using the C programing language,
- use the μVision4 integrated development environment, and
- demonstrate uploading of compiled code to the microcontroller, and
- use the LED display on the Keil Evaluation Board.
- The implementation of a dynamic memory allocation scheme with the outcomes that you will
- use array and linked list data structures, and
- use bit-wise operators in C to achieve the goals, and
- apply tracking of memory allocation and deallocation.
- The implementation of an algorithm with the outcomes that you will
- use task creation and destruction to solve a problem using parallel computation,
- use the UART, and
- use busy waiting as the means of synchronization.
- use semaphores as the means of synchronization.
- The implementation of an environment with the outcomes that you will
- use interrupt handling routines to intercept signals from peripherals,
- use the general-purpose input/output (GPIO),
- show output using the LEDs, and
- show output using the LCD screen.
You will note that Project 3 straddles the mid-term week. This project is consequently more light-weight than some of the other projects.
The purpose of the laboratories is to allow you to interact with and seek help from the laboratory instructor and teaching assistants. All teaching assistants will be available for all laboratories. This will be the primary interaction time with the teaching staff.
Submission requirements
For each proejct, you will create a directory uwuserid_p1 or uwuserid_uwuserid_pN where the uwuserid are the uWaterloo user identifiers (e.g., dwharder) of the individuals involved in the project and where N is one of 2, 3 or 4 (Project 1 is submitted individually, although partners should work together to help each other). For example, if the instructor was working together with Chris Eric Hitchens on Project 3, the directory name would be dwharder_cehitche_p3 or cehitche_dwharder_p3. In this directory, you will place files relevant to the project.
You will then use a zip program (one that produces a .zip file) to archive that directory and the name of the submission will be uwuserid_p1.zip or uwuserid_uwuserid_pN.zip.
For example, if you have the open-source archiver 7-zip installed in Windows, Mac OS X or GNU/Linux, you could right-click on a directory to archive that directory, as shown in Figure 1.
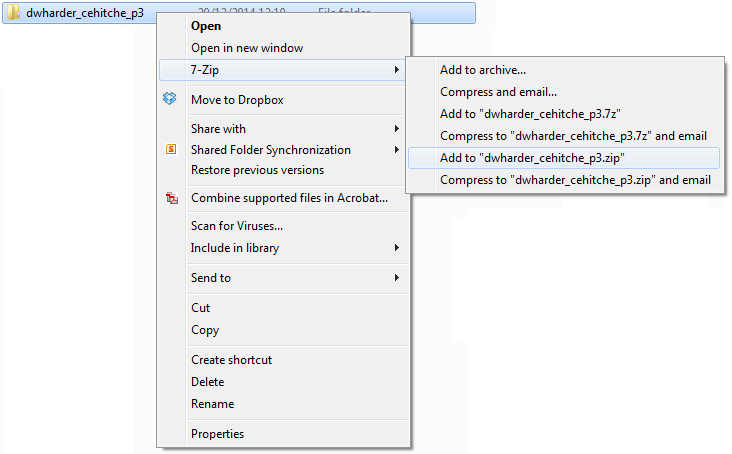
Figure 1. Using 7zip to create a zip file (shown in Windows).
You should copy the zip file to a new directory and try extracting it, as shown in Figure 2.
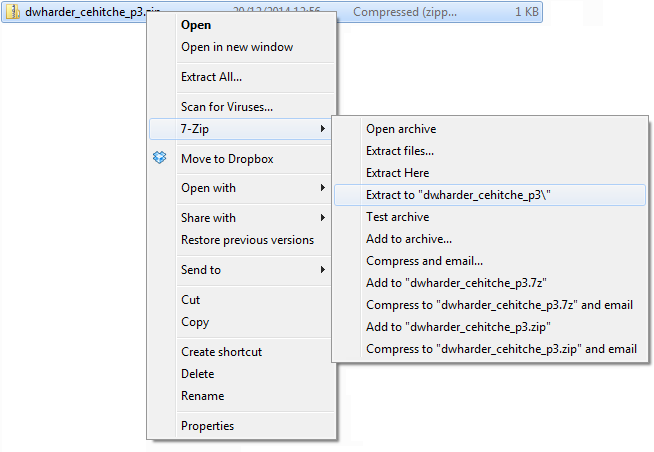
Figure 2. Using 7zip to extract files from a zip file (shown in Windows).
If you do not have an appropriate tool available for zipping files on your computer, you may do so in GNU/Linux by copying the files there with a file-transfer protocol (FTP) client (e.g., SFTP) and then using the zip command. A tutorial for using SSH and SFTP is available here.
Once you are in GNU/Linux using using a shell client (e.g., SSH), you can proceed to create an appropriately named directory:
$ mkdir dwharder_cehitche_p3
Now, copy the files into the directory using your FTP client and zip the files.
$ ls dwharder_cehitche_p3/
half_fit.c  half_fit.h  utils.c  utils.h  other files...
$ zip dwharder_cehitche_p3.zip dwharder_cehitche_p3/*
  adding: dwharder_cehitche_p3/half_fit.c (deflated 62%)
  adding: dwharder_cehitche_p3/half_fit.h (deflated 57%)
  adding: dwharder_cehitche_p3/utils.c (deflated 65%)
  adding: dwharder_cehitche_p3/utils.h (deflated 61%)
  adding: dwharder_cehitche_p3/other files... (deflated 57%)
$ ls dwharder_cehitche_p3*
dwharder_cehitche_p3.zip

dwharder_cehitche_p3:
half_fit.c  half_fit.h  utils.c  utils.h  other files...
For more information about zip on GNU/Linux, you can view the manual page using the man command:
$ man zip
ZIP(1L)                                                                ZIP(1L)

NAME
       zip,  zipcloak,  zipnote, zipsplit - package and compress (archive)
       files

SYNOPSIS
       zip  [-aABcdDeEfFghjklLmoqrRSTuvVwXyz!@$]  [-b path]  [-n suffixes]
       [-t mmddyyyy]   [-tt mmddyyyy]   [  zipfile  [  file1  file2  ...]]
       [-xi list]

       zipcloak [-dhL] [-b path] zipfile

       zipnote [-hwL] [-b path] zipfile

       zipsplit [-hiLpst] [-n size] [-b path] zipfile

DESCRIPTION
       zip is a compression and file  packaging  utility  for  Unix,  VMS,
       MSDOS,  OS/2,  Windows  NT,  Minix,  Atari and Macintosh, Amiga and
       Acorn RISC OS.
You should check to ensure that your zip file is correct by creating a temporary directory, copying the zip file to that directory, changing to that directory and ensuring that when you unzip the file in the temporary directory, you correctly extract the files in question. The more command displays the files in question, so you should check to ensure that the critical files are correctly restored.
$ mkdir tmp
$ cp dwharder_cehitche_p3.zip tmp/.
$ cd tmp/
$ unzip dwharder_cehitche_p3.zip
Archive:  dwharder_cehitche_p3.zip
 inflating: dwharder_cehitche_p3/half_fit.c
 inflating: dwharder_cehitche_p3/half_fit.h
 inflating: dwharder_cehitche_p3/utils.c
 inflating: dwharder_cehitche_p3/utils.h
 inflating: dwharder_cehitche_p3/other files...
$ ls dwharder_cehitche_p3*
dwharder_cehitche_p3.zip

dwharder_cehitche_p3:
half_fit.c  half_fit.h  utils.c  utils.h  other files...
$ more dwharder_cehitche_p3/half_fit.c
#include "half_fit.h"
#include "utils.h"
#include <stdio.h>

#ifndef NULL
	#define NULL ((void *) 0)
#endif

/**********************************************************************
 * Defined constants
 * =================
 *
 * These are all the defined constants that indicate various aspects
 * of the memory being allocated.  The only real requirement is that
--More--(12%)
$ cd ..
$ rm -r tmp/
This will create an appropriately named file which you can then copy back to a system where you can submit it to uWaterloo Learn.
Project demonstrations
Projects must be demonstrated to a teaching assistant during a scheduled laboratory. For Projects 1 through 3, you may demonstrate your project to a teaching assistant either:
- at any time during the laboratory associated with the project, or
- during the first hour of the next scheduled laboratory.
You must submit your code to uWaterloo Learn Sunday evening at 10:00 P.M. following the laboratory associated with the demonstration of the project (the Sunday following Laboratories 1, 2, 4 and 6).
The last project must be demonstrated during Laboratory 6.
Subsequent demonstrations
The goal of the projects is to allow you to become exposed to and familiar with microcontroller and real-time development. Suppose that you are not able to demonstrate your project successfully. You may get either a zero or a partial grade. However, you can still increase your grade after the fact by
- meeting with the course instructor where you describe what was the issue with your laboratory demonstration and show your corrections, in which case, you will be awarded up to a grade of 80 %, or
- at the end of a term, the course instructor will review any submitted project where the grade is less that 60 % and determine if the work done merits a grade up to, but not exceeding, 60 %.
The one exception is Project 4, where the course instructor will simply review any projects that achieved a grade less than 80 % and determine whether they deserve a grade up to, but not exceeding, 80 %.

Department of Electrical and Computer Engineering
University of Waterloo
200 University Avenue West
Waterloo, Ontario, Canada N2L 3G1
Website maintained by Douglas Wilhelm Harder